
The Conex Shuffle and Slide
Three days of hard work and one day of prep work has kept the Planner very busy. The Doubter came down for a three day weekend to help with the conex shuffle and slide. However, before any shuffling or sliding could happen, more prep work had to be completed.
Paint. First step is always the hardest. Where to start, when to start, should I start. Make painting the first step and the step now becomes harder. Nobody likes to paint yet it is a most crucial step at Boxes in Fields. One can never take too many precautions when it comes to rust. Rust, the arch enemy of coastal living. When boxes are slid together, the end walls are going to be too close to together to paint. To help reduce the rust corrosion between the two boxes, end walls covered in another thick layer of paint.

Second coats of red primer were applied to all end walls and everywhere in between. One can never really have too much paint in these rusty conditions. Besides, the rust red primer was a nice color. Thinking maybe the whole box could be this color. Not fire engine red, not maroon. Flat in color with a bit of shine. Hmm….


Adjoining plates. Second step in the prep work process was the addition of an adjoining plate. This plate was needed in order to combine the two boxes as one unit. In order to do this, both boxes had to be cleaned of all wall removal residue. Grinding divots, plasma dust, years of paint and grime, and old rust will result in a plate that does not lay flat.


The plate was first tacked to the red box. Original thoughts were to weld the entire 40′ of length. However, once the longer tacks were in place it was noticed the flat stock was warping. Full length welding was scratched for just multiple short tacks. Less work is ok by me. Not that I was welding or anything. Welding, ha! I wasn’t even taking pictures. Later when when the blue box is slide over it will be tacked and welded into place too.
Simple, right? Sure, it was just 80′ of additional grinding, 80′ of plate cutting, and then 80′ of plate tacking. Simple, yes. Time consuming, yes. 80 feet of yeses to be exact.


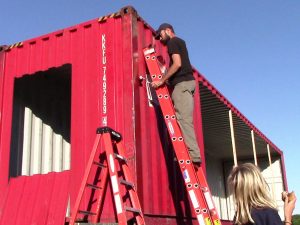
Corner punches. Third step in the prep work was closure of the corner holes with pre-punched plates. The Doubter punched the plates in Big City #1 sometime over the last two weeks. He has this handy dandy machine that makes punching plates as easy as buttering bread. Bread warm butter that is, not cold butter that tears the bread when spread. Punching plates is really as easy as pushing a button. Both the red and the blue boxes were closed with plates. Four corners and 45 minutes later, the boxes were ready for the last step.

Release the tacks. The fourth and final step in the prep work was the easiest and consisted of releasing of the tacks holding the box to the subframes. Mind you, the box was tacked into place but each tack still took several minutes to remove with a grinder. To ensure each corner was fully released, a high lift jack was used to pick up the corners.


Time to shuffle. With all the prep work done, it was time to start the conex shuffle. The shuffle is a two step process: slide red box over and then slide blue box off trailer onto subframes. Having already slid on a box, I was not expecting to have any stomach issues with the second box. In fact I was so far from worried, I found myself staring off into space instead of taking pictures and videos. Oopsy #1.


Using a combination of tractors, high lift jacks, industrial tow ratchets, cables and chains, and standard come-a-longs, the red conex box slide over with only one minor glitch.

C-clamps are not designed to be used as pull points. What was once a C-clamp is now a pretzel. The Planner said its fixable with a big enough hammer and maybe a vise.


Bumping the box with a tractor is harder than it sounds. Not wanting the box to slide off while trying to center on the subframe, two centering points were mounted on the pads. Once centered, each corner was tacked into place as the last step before starting on the sliding of the blue conex box As you guessed, there are no pictures of this. To my credit, I was cooking dinner, but still I know. Pictures make a blog. Sorry.

Saturday, dawned clear and cool yet again. This is some crazy weather. NO I AM NOT COMPLAINING! I am simply stating for blog purposes. It was cool not cold. The Kid never missing an opportunity to wear his most favorites was in his well worn 6T khaki cargo shorts (for those of you without kids this means shorts of this size are not usually seen on kids aged 9 and 4’7″), his favorite surfer shirt now stained with white paint from the little peeper coops, a fleece lined jacket, and flip flops. That’s a true Texan right there. Spring, Summer, Fall, Winter, wet or dry, inside or out, Texans wear flip flops. In college, way back in the day, I would wear fleece sweaters, rain gear, and flip flops to class in the winter. Feet get cold, toe socks. Yup, those were the good old days. Toe socks! What a concept.


Sliding the blue conex box was almost exactly the same as sliding the red conex box. Frame channels were attached to the subframes, the cnex box was lifted with bottle jacks and secured to the correct height with a random assortment of blocks, and the frame channel ramps were placed under the conex, secured to the subframe, and then supported with more random assortments of blocks to keep it from bending like a wet noodle. Well, it would bend a little as there was still a fingers digit of space left between the board and the channel.

One major difference in the sliding of the blue conex was the use of the tractor. Unlike the red conex, the tractor was used to push the conex across the ramps. Having the red box in place also meant the blue conex box could not slide off the back side. Yeah.

The Doubter hoping to ease some of my stress in keeping the box from sliding to one side or the other built guides. They were larger versions of the guides used to remove the box from the gooseneck. These were FANTASTIC! They kept the conex from sliding off the subframes. Double yeah. Not that either box ever slide off the frame but there was always the potential. The Planner kept telling me it would not actually fall off but I think he is wrong. I believe once one sides slips off the remaining 39′ will follow suit. Hasn’t he ever heard of leaping lemmings? Falling dominos? Potatoes in the deli bin when the bottom one gives out?


The tractor pushed the conex box until it reached the frame channel supports on the subframe. With the tractor applying gentle oh so pushing pressure, highifts were used to pop the box over the channel and then again when it bumped up to the the substructure.


The tractor was then used to slide the box to its farthest reach. At this point, the box was almost completely on the subframe and as before, the storage box ramps were used to push the conex into its final place.


Alignment of the box was done using gentle nudges by the tractor. And boy howdy were they off centered. Let me say how thankful I am to the Doubter as he did not doubt my rational fear of the box sliding off. The Doubter claims the tools were just to keep boxes sliding smoothly down the substructure but I am certain without them this blue box would have slide off. I mean seriously, just look how close it was to falling off from being SO far off centered. When looking down the short side of the box, the inside is actually on the substructure meaning the opposite corner is about to fall off. If Boxes in Fields decides to put more conex boxes in the air, I want guide rails on both far ends and stopper plates at the backside. All used to keep the boxes on the substructure. Oh, and hey Planner, the conex box could actually lemming itself right off the subframe. I’m just saying…


Before the boxes could be pushed all the way together the adjoining plates had to beat into submission. Some of the issues were from the plates warping, some was from the boxes bot being built to exactly the same standard, some was just simply from years of usage. In some spots there was more than a 1/8″ difference. Talk about a tripping hazard. Once the boxes are fully pushed together the adjoining plates will be welded together creating a nice solid plate.


Remember how during my initial walk around of the first Conex Slide it was noted the conex boxes did not touch the substructure in the middle? The Planner still stands by the design of the boxes but to appease both me and the Doubter and aesthetic reasons, 5/8″ plates were placed under the boxes and welded onto the subframes and then plates were welded to conex box. Lots and lots of welding. Stick after stick of welding rods.

Boxes were tacked into place and then both red and blue boxes were fully welded into on the substructure. Lots and lots more welding. Stick after stick of more welding rods.


Finished. Finito. Estodo. Complete.


Told you it was going to be easy peasy. It was so easy in fact, I cooked a chicken on the BBQ. No, I helped cooked a chicken on the BBQ. The Planner started the fire. I maintained the temp and asked about a bazillion questions. BBQing is harder than it looks. The Kid and I also made a key lime pie for desert. This is the first time in a long time the Kid wanted to help cook. It was just like the shake and bake commercials from the 90’s except this was it was mix and bake and he helped. BBQ chicken and key lime pie after a days worth of work. What a great way to spend a Saturday. What a great way to end a very busy week.


Let me conclude with this image. The one on the left is the image I took. The one on the right is the edit Google Photo made on its own. Notice the BBQ pit behind this dratted rooster? It took all my will power to not cook this rooster. No amount of Google Photo touch ups can make me want this rooster. You know anybody looking for a rooster. He is free! F.R.E.E.
And in case you are wondering, no there was not a final picture/video/gopro snapshot of the two boxes slid together. NOT. A. SINGLE. PICTURE. Oopsy #3.